Friday, July 21, 2023

Music Streaming: New Single Album

Actually a quick 2 song single, with drum & bass sketches created in the past few months.

Experimenting with some competing rhythms and mastering with loudness in mind.


Thursday, July 20, 2023

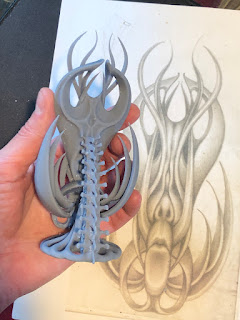
Oracle Mask Sketch - Sculpture

 After many attempts at translating this sketch to a sculpture, finally some success.

This sketch was from around 2010. Between that time and now, I attempted to create sculptures in clay, with complex armatures, various attempts using paper mache and paper strips bonded to thin wires to build up the form. Also made attempts at using a combination of paper pulp and resin formulations. None were able to get the accuracy, detail and structural stability that is possible today. I have improved my knowledge of 3D modeling and sculpting techniques, and learned 3D printing techniques using cured resin. Now it is finally achieving its intended look and form as depicted in the sketch.

15cm tall final print, includes stand

3d print, direct comparison to sketch printout

prototype shapes in back form the stand

This was only the first printing of this sculpture, and so far it was a very successful result. The stand design is experimental, and may be changed to a simpler concept. As for realizing a complex composition of interwoven shapes, it may not have been possible using any other method in the past. Not to mention the consistent quality and potential for multiple copies to be produced.

This sculpture, and several other will be coming to my online shop in the near future. This will include the "Nose Totem", and "Humanoid Pupae" diorama. As soon as the final versions are completed, with possible variations, and final painted surface presentation.

Notes:
The sculptural form is represented accurately with no noticeable imperfections or delamination. The print itself will definitely need to be improved. The print orientation required many more layers, with a build time of 14 hr. The supports were effective, but also excessive, and caused surface damage where they intersected places on the model.

Next:
Test alternative orientations, and manual supports. A second print was attempted with some mix of used resin, different rotation and manual supports. the orientation was ok, but resulted in some trapped resin, and used resin may have been the cause of delamination and strong bed adhesion. I would recommend all new resin. possibly slower initial lift speed.


Thursday, June 15, 2023

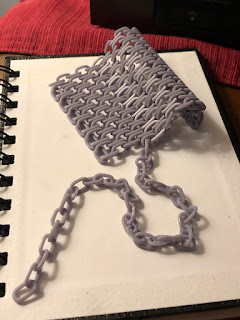
3D Printed Block of Chain


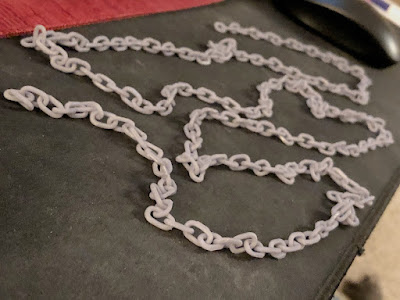
3D Printed chain length


This was a 3D printing test for an articulated chain layout. It used gray UV cure, water washable print resin. The design for the chain is continuous, and already linked together. The pieces are close enough in proximity to get lightly fused, so as to be easily snapped apart after curing. This single level was printed in about 20 minutes. At this particular scale, 1 level made a chain about 60 inches in length. If increased to multiple levels, it could allow a block of chain potentially 100ft long.


Chain strands model layout

Single Level

Unsnapping fused elements

Final released links


Analysis:

The links were heavily fused in this test, likely from overexposure. Printing did come apart without breaking. A few links cracked, and there were chips and pits where the thick material was snapped apart. The links are strong enough to work with for miniature models. 

This trial used no supports and although convenient, there were side effects. The base points fused well, but the base layer thickness created difficulty unsnapping the links. Also the reflectivity of the steel base-plate creates distortion in material exposure of early features.

Overall a successful test with some further tweaks needed to improve the outcome. We will continue with variations of this experiment, maybe with slight layout adjustment and supports. Also find out how it scales.


Next Steps:

  • Adjust exposure time and print settings
  • Support the base layer
  • Test other possible layouts
  • Determine how small it can scale
  • Attempt to add several more levels


Thursday, June 1, 2023

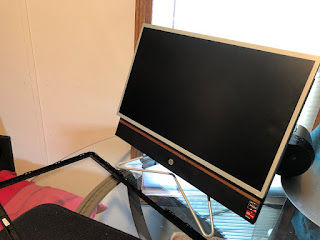
All in one PC rebuild

 HP All-in-one had broken screen, but this salvaged LCD Works.  It was a touch screen, but now it will just be a plain non-touch panel. Making it fit is going to be the main challenge. The system is functional, but the platter hard drive was replaced with a 1Tb SSD.

Testing a salvaged LCD Panel,
Miraculously compatible cables!

Do not accidently mount the screen upside-down.

3D Printed structural non-solid

The LCD will be mounted to a wood back panel, that fits inside the computer where the old touch screen was seated. It just needs some spacers for the cables. For this, some non-solid spacers were 3d printed and fixed on the back, then mounted on the wood panel. This just might work.

Spacers ready to mount
Project in progress...

Inside view: small hole cut for video power access.
SSD dropped into place. Such a tiny motherboard.

Next Steps:

1. mount screen
2. measure and design side brackets
3. drill case edges to line up with the screen mounts\
4. work the cables into place and plug in.
5. screw mount screen and figure out final trim for screen.

Once the spacers are mounted to the panel and ready to install, a few more 3d printed brackets will be required. The LCD has screw holes on the sides which can be used to mount into the plastic edges of the case, where new mounting holes can be drilled. The 3d printed brackets will go along the sides of the screen with screws to enable removal and maintenance.

There are holes to allow the video and power cabling to go through, but the next challenge will be to wrangle the stiff video cable in a way that will not kink or obstruct the components.

When everything is mounted and plugged in, there is a bezel from the salvage LCD that may be able to be used to give it a cleaner look instead of bare metal around the edges. it may not work without modification, due to the (pending, 3d printed) mounting brackets.

cables connected ok, and LCD dropped into place.
from here we can see the webcam being obstructed.

all in one with extra large screen

the bezel still fits nicely.

An unforeseen issue is the popup webcam on the top. it cannot see over the larger screen. The cam can be detached and remounted on the new screen.

Next:
1. installing windows
2. updates and drivers
3. attempt webcam modifications
4. prepare screw fixture plan and secure the new screen assembly.


Thursday, February 16, 2023

Music Streaming

 UPDATE:

Some sound projects have been mastered, and are starting to make it to streaming platforms. Check it out. See how loud I was able to make it!