Showing posts with label design. Show all posts

Thursday, April 18, 2024

AI Music: More Playlists...

 Playlists from infinity...

More Playlists Are Evolving... Suno AI:

AI Generated Music has come a long way in just the past year. Now I've had the chance to experiment with it and begin producing some interesting things. They can be quite catchy, and do sound like tracks I would have made, or found and put into my other playlists. Some definitely have promise as demos for real production, re-building, remixing, inspiration for your own instrumentation, or just enjoying the unexpected, combinations of musical styles and patterns.

D64 Trax - Playlist on Suno


BandCamp - Demo Album
(in progress)

Thursday, June 15, 2023

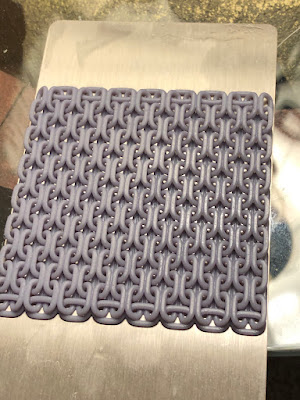
3D Printed Block of Chain


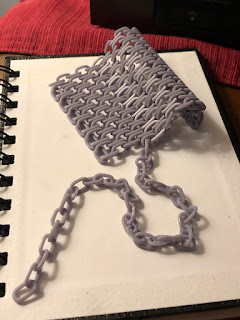
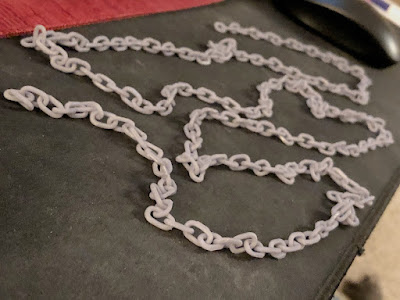
3D Printed chain length


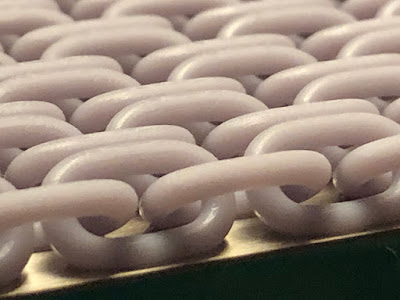
This was a 3D printing test for an articulated chain layout. It used gray UV cure, water washable print resin. The design for the chain is continuous, and already linked together. The pieces are close enough in proximity to get lightly fused, so as to be easily snapped apart after curing. This single level was printed in about 20 minutes. At this particular scale, 1 level made a chain about 60 inches in length. If increased to multiple levels, it could allow a block of chain potentially 100ft long.


Chain strands model layout

Single Level

Unsnapping fused elements

Final released links


Analysis:

The links were heavily fused in this test, likely from overexposure. Printing did come apart without breaking. A few links cracked, and there were chips and pits where the thick material was snapped apart. The links are strong enough to work with for miniature models. 

This trial used no supports and although convenient, there were side effects. The base points fused well, but the base layer thickness created difficulty unsnapping the links. Also the reflectivity of the steel base-plate creates distortion in material exposure of early features.

Overall a successful test with some further tweaks needed to improve the outcome. We will continue with variations of this experiment, maybe with slight layout adjustment and supports. Also find out how it scales.


Next Steps:

  • Adjust exposure time and print settings
  • Support the base layer
  • Test other possible layouts
  • Determine how small it can scale
  • Attempt to add several more levels


Tuesday, July 26, 2022

New Designs for Prints and Products.

Artworks that I have created, are now starting to be available as prints and home décor items. Take a moment to check out what designs are now in store. I am looking through the archives and adjusting them for the Society 6 Shop. More to come...

 Blendr at Society 6


Friday, December 4, 2020

Sounds Inspired by Arrival: Sample pack & Bitwig presets

Sounds Inspired by "Arrival, 2016" (originally designed by Jóhann Jóhannsson)
This project is a learning exercise, to develop deep listening and sound construction methods, based on films. A work in progress that could be updated with more content.
   
Sample Pack:

Samples of the instrument playback in WAV format.

Saturday, March 21, 2015

Signal Generator interface design

The concept for this project was to be a signal generator, inspired by hardware oscilloscope. This device is used for testing sound output and frequency response in speakers or microphones. Control parameters were defined and assembled into a front panel, graphical elements illustrated as bitmap.

DOWNLOAD DEMONSTRATION VERSION
Download VST Version

Disclaimer:
Consider this a test unit, it may not work entirely as expected, and will be improved and updated as i learn.
Take care in its operation, as it can produce a wide range of signals; some settings could produce sounds with the potential to cause damage to your ears, and sound equipment. explore at reasonable levels. you will assume the risk.


functions include:
power (on/off): volume control, decibel level meter
modes: noise, sine, sweep
signal filtering: lowpass / highpass (with on/off)
oscillator module (on/off): dual oscillators with independent multiplier
channel shifting: 
 (a/b faders): channel delay, L/R shift
 (switches): delay invert and fade type(crossfade or blend)
main display: switchable(waveform/spectrum), sweep rate, frequency control, image hold.

Operation Overview:
Before switching power on, ensure the large volume dial is set at its lowest value (S/W direction) by clicking  and dragging down while over its image. tap the switch labeled "power"; a green light will confirm generator activity. slowly rotate the volume dial by vertical drag. choose an emitter type with the small silver dial below output volume. this can select either noise, tone, or sweep. following to the right of this selector, 2 small inset dials on the display, control sweep velocity and tone frequency. above them, the monitor shows their current values. also nearby, it shows decibel value. a switch at the top right of the display can flip between waveform or frequency graph projection (still in need of adjustment). at the lower right of the unit, two black faders have an effect on channel offset. the top can delay a channel up to 500 samples. the lower shifts left or right dominance. when the light below illuminates, center position is absolute. there are some tiny little switches on either side. the first indicates which side is being delayed. the other determines whether the sliders fade or blend across channels. very slight differences, mainly experimental. filters can be activated with the switch between filter dials. on the left increase lowpass filter to cut off high frequencies. on the right, highpass can exclude low frequencies. the oscillator module next door will modulate a tone at a wide range of speeds. the switch give can access to even higher rates. there happens to be a co-oscillator, to add further disruption. sometimes a complex or unpredictable tone can be created.